Monday, October 22, 2012

Design Wall Monday Oct 22, 2012

Have you ever made a "Winning Hand" by Quilt In a Day?  This is fast, fast, fast and fun!  I picked up the pattern/booklet at a garage sale several weeks ago.  When I showed it to a quilting pal, she said she'd never made one and suggested it would be a good one to try on one of our stitchin' days.  I made mine scrappy, but used the same colors throughout.  And yes, it is so easy. 

When I assembled the blocks, I tried to put the colors in the same position in each block, but messed up about three.  So to try and cover it up, instead of setting them exactly the same, I mixed them up.  Not sure about that.  I made 15 blocks for a twin size, but I might re-set them to match each other and just have a lap size.  Heaven forbid I take the three apart and re-sew them.  Nope.  I'm using the deep purple for sashing, and the floral for the border.  


Friday, October 12, 2012

Whoop! Whoop!! Oct 12, 2012

Yay -- I got something quilted, at last, at last!!  My shoulder has been giving me fits, so I've been getting chiropractor-ed for several weeks, and I'm almost good as new.  Well, as new as you can be at my age ;-)  

This quilt is one of two that belongs to my friend Phyl.  She had a box full of full fans, fan blades and bits and pieces of fabric that her grandmother and her mother had worked on decades ago.  Some were hand-stitched, some were machined pieced, but putting them together created some interesting fans, none of which lay flat.  She had decided they were beyond help and wasn't going to do anything with them.  Another friend, Sally B, and I protested loudly!  Phyl gave in, and the three of us cut and pieced and stitched and smooshed and ironed the fans into submission, added centers with rickrack around them, and made enough full fans to make two twin bed toppers!  I was able to finish quilting the first one, and I believe they will be treasured for generations to come.  

Whoop!  Whoop!! 

Go to Sarah's place to find more accomplishments: http://confessionsofafabricaddict.blogspot.com/2012/10/can-i-get-whoop-whoop-theres-floor-in.html


Thursday, October 4, 2012

Anita's Arrowhead Tutorial

Since there was interest in having a tutorial for Anita's Arrowhead blocks (see my last post), here you go!  First, I have to say, this is a pattern from a Quiltmaker magazine, but that only date that appears is 2011, so I can't tell you which issue.  

This is a really unique technique, and fun to do.  That said, the first few times you make it, you'll probably want to refer to the instructions.  The main thing is, watch where the darks and lights go when you lay it out for stitching!  

The pattern calls for 8" squares of fabric, that are cut at 2".  I already had a big stack of 6" squares, so in order to have it look better proportioned I cut the pieces at 1 1/2" and that's what I'm referring to in the directions.  

Stack a dark and a light square, right sides together. Make a mark on the top right and bottom left, 1 1/2" from the edge.

Sew 1/4" seam down from the mark at the top right, to the bottom, pivot and continue across the bottom and sew off the edge.  Turn and do the same on the other side.

Yes,  you'll have two open spots!  Weird, huh?  It's ok.  Then you will cut the square diagonally, once.  Watch the direction of the diagonal.


Now take the top triangle, turn it and stack it on top of the bottom triangle.  
Now you'll cut a strip 1 1/2" from the left and from the bottom.  

You'll wind up with an assortment that looks like this.  Snip the rabbit ears and press the seams open.
Rearrange the pieces according to the following photo, paying attention to the placement of the darks (brown) and the lights (print), and sew.
Trim to make it a 6" square.


Tada!  Now you can put a bunch of these on your design wall and decide on the layout.  (I still haven't decided on mine.)

If you have any questions, please leave a comment.
Enjoy!
Brita

Monday, October 1, 2012

Design Wall Monday Oct 1, 2012


Which-a-way should I go?  This pattern is called "Anita's Arrowhead," and appeared in Quiltmaker magazine last year (thanks, Debbie!).  The technique is really fun to make -- you start with two squares sewn right sides together, leaving 2" open on the top right and bottom left.  It's then cut diagonally, stacked and cut twice more.  When it's rearranged, this is what you get!  Maybe I should take photos as I make a block so you can see?  Then when the blocks are laid out, you can put them together with dark edges against light (top picture), or light to light and dark/dark.  Which way do you think it looks best?  I can't decide!

The Kaffe blocks I had on my design wall last week just didn't want to come together.  So I lost interest, and they're packed away (story of my life).  But I still wanted to play with Kaffe fabrics, hence the blocks shown above.  This is a good project to work on during my stitching days with friends because they aren't difficult.  You just have to make the first one to use as a reference -- and trust me, you really, really need to have it :-D

So there are you are, for this week's design wall Monday.  Go to Judy's website at www.PatchworkTimes.com to see links to other design wall projects, that's always fun!


Monday, September 24, 2012

Design Wall Monday Sept 24, 2012

Meh.  I'm not so much in love.  The fabrics make me so happy when I fondle and pet them, so I cut 10" squares, and planned to cut them diagonally twice, then insert 1" strips of a contrasting fabric, with a square of a third color in the middle.  The pattern is "Hot Cross" from Schnibbles Times Two.  Before cutting every piece, I decided to audition the squares with strips.  Just not feeling it, at least not today!  I'll play some more, and maybe put away the 10" squares and strips to use another day.  A dear friend of mine keeps reminding me that there is no requirement to finish a UFO, so I'm sure the same holds true for a design wall experiment :-D

However!  A friend was visiting last week and I showed her some things I'd snagged at a yard sale, including the Eleanor Burns' book, "Winning Hand."  She said she's had the book for years, but has never made one.  They are so easy-peasy, we agreed to have our fabrics pulled and we'd make one at our next get-together.  Here's what I've gathered -- the floral will be the border, while the cards will be scrappy yellow, green, blue and pink/fuschia.  I haven't decided on the background -- the floral print has a pale green background.  Wish I had enough in my stash, but, remarkably, I don't!
So there you have it, my design wall and future design wall in one show and tell!  Go see what others are working on at Judy's blog: PatchworkTimes.com and join in!

Sunday, September 16, 2012

IHAN winner! YAY!

Lucky me!  Last week, sweet Kelly Jackson of I Have A Notion, sent me a sushi roll that she got on her tour of Hoffman Fabrics, as a giveaway winner!  Whoot!  It arrived on Saturday, and looky here!
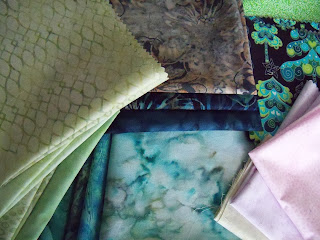
There are some of Hoffman's wonderous batiks, to die for.  I've already added the four light greens and the pale lavender to a stack of fabrics I'm collecting for a project.  (I have no idea what the project will be, but I'm loving the look of the colors.)  At the top right of the picture is a cute Christmas print, together with a glimmery green -- I'm going to have to shop for some of that, it's striking!  

In the second picture is something I haven't even heard of yet -- 3D fabric!  Yes! You get these 3D glasses -- which are different from the old-fashioned red lens and green lens that I remember -- and while the fabrics are cute in themselves, the pictures actually come forward in a true 3D fashion!  I've got to come up with something really special to use these fabrics.  Kiddos will get a huge bang out of them, but Mr. Happiness and I had a blast going through my stash, looking at various fabrics that look really weird thru 3D glasses.  

Thank you, Kelly, for your generosity in sharing the yumminess!  Go see this special gal at her blog and shop, she always has some kind of mischief interesting things going on.  You can catch up with her (or try to) at Ihaveanotion.blogspot.com 

Friday, September 7, 2012

Whoop! Whoop! Sept 7, 2012

Fall Fantasia went to the Fair, and came home wearing a blue ribbon!!  I'm just thrilled :-)  Another quilt, my Mary Engelbreit "Friends" lap quilt also won a blue ribbon.  Woohoo, happy dance.  And Whoop! Whoop!  
The pattern for this quilt was pretty easy, it was a download from AllPeopleQuilt.com.  But the best part was the fun of pulling out all the batiks I could find that would work for an autumn quilt!  The blocks were pretty small, finishing at 6", but they were enlarged by adding 2 1/2" sashing strips, log-cabin style, on just two sides.  Alternating strips on the right side then the bottom quickly added up to be a 12" block!  You could use virtually any block for the center, add sashing to two, three or four sides and you've got a quick way to make a bigger block!

During the time I worked on the Fall Fantasia, I quilted a huge quilt (100x110, I think it was) for a friend, and forgot to take its picture.  She had made it some time ago, and it was doomed to the storage closet because she'd decided to hand quilt it.  But because it was so large, she just couldn't take that first bite!  I did a wavy line from side to side, inserting some swirls to give it a greater swoopy feel, and it turned out nice.  


I had a remnant of upholstery fabric I'd picked up years ago that I intended to use on the two bar stools we have at the kitchen counter. Just wanted to spiff them up a bit, and there was a spot on one seat that I just couldn't get clean.  I hadn't done any upholstery before, but after Mr. Happiness took off the seats, I cut and stapled awhile, and suddenly they were like new!  Easy, peasy, and quick! I really love this fabric and wish I had enough to redo the dining chairs.  

Somehow, I've managed to pinch a nerve in my neck and I have pain down my shoulder, along my arm and into my little finger.  So I've been chilling on the couch for a couple of days, and I really didn't feel like going to my guild meeting today.  But I promised someone I'd meet them there, so off I went.  I'm so glad I did!!  It's so refreshing to visit with my girlfriends, experience the comraderie of fellow quilters, and be inspired by the talents of the ladies in my group.  I'm chomping at the bit to start on another quilting project, but I have to be good for another day or two.  

Meanwhile, go to Sarah's blog -- confessionsofafabricaddict.blogspot.com -- and see what the Whoop! Whoop! is all about!

Celebrate the changing of the season!